Wednesday, October 16, 2013

Shrug from the Modern Twin Set Pattern

Alison found this really cool cotton yarn at a thrift store. It was vintage Vendome yarn: Vendome Raps 100% cotton yarn. While we haven't found much information about this yarn, we decided that I should make something with it. The color is amazing; it's a beautiful green, a little emerald, a little leaf. A lotta fabulous. Generally, I hate working with cotton yarn. Most days I would rather poke out my eye with a knitting needle than work with cotton. But this yarn is different. It was soft, didn't dry out my hands, and looks so pretty made up - it has a bit of a shine.

Vendome Raps 100% cotton yarn.

With the yarn in hand, we had to find a pattern that would work for the weight and the amount of yarn we had. We decided to go with the shrug from the Modern Twin Set pattern. The Shrug required 6 ounces of a worsted weight yarn. With the holidays coming, we decided that the Modern Twin Set shrug would be the perfect pattern for this color and this yarn. (The color is all over the place in these pics. My little camera was having such a rough day - it couldn't decide where to focus. The color in the pic above is the closest to the actual color.)

Shrug in progress. Lifelines in use.

I was excited about the shrug, so I started knitting. It went pretty fast. It is a 2 x 2 rib, so mistakes are easy to identify and easy to fix. I added lifelines because I sometimes forget to look back on what I have just knit to make sure everything is in pattern. I don't mind fixing stitches, but I don't want to drop back to the beginning of the project because I don't  use my crochet hook to stop the stitches from raveling back to the beginning.

Knitting completed. Now it's just waiting to be sewn up.

Now I have to seam the shrug sleeves together. I'm a little nervous about it. I am looking at videos and websites trying to figure out what type of seaming to use. I will post pics once I have finished it.

Bound off edge - done in 2 x 2 pattern.
I used a stretchy bind off so the back will stretch,
and hopefully not distort, when the shrug is worn.

Happy knitting!

Kristen

Wednesday, October 9, 2013

Free Monthly Pattern Download for October (crochet)

We have been on a crochet roll lately....

We are offering a circle hat and bag pattern this month. Based on the granny square design, these should be fun projects to make your own.


Information on the yarn is a little scarce. It looks like this may have been a rug yarn. According to a conversion chart I was looking at here, the sizes 5 and 6 crochet hooks would be equivalent to a modern H and I (US). Other patterns found online required a size J hook when working with this yarn. It would make sense to have the stitches a little smaller and tighter for a purse, as compared to a rug. It's hard to look cool and put together if there are items spilling out of your purse as you walk down the street.

Click on the pattern link or check out the "Free Monthly Pattern Downloads" page to be taken to the free pattern compliments of eStitched.

Happy crocheting!

Wednesday, September 25, 2013

Pinwheel Afghan - a finished object

The Pinwheel Afghan is complete. What started as a project to use up yarn from the granny square ponchos became a really bright, colorful and fun project.

Finished measurements: 38 x 64 inches.

The pattern called for a 1mm crochet hook and bunches of lighter weight yarns (28 colors to be exact). I don't have the patience to work with the tiny hooks, though I wish I did. For my afghan, I used an "H" hook and worsted weight yarns. We had a bunch of Loops & Threads Impeccable and Vanna's Choice acrylic yarns that needed to be used. I like the Impeccable yarn. It works up easily and once washed becomes pretty soft and snuggly. It wasn't splitty to work with, either.

When I started the afghan, I placed all of the yarns in a tote bag and would grab colors at random. That worked for a few "squares" but then I started getting a little crazy about which colors should be next to each other. I'm a little too tightly wound to let my hexagons create themselves.

The hexagons are easy to make and the pattern is easy to memorize. I made many motifs at my sons' baseball practices and games without having to look at the pattern. They were easy enough that I could carry on a conversation while working on the afghan.

Measurement of the each hexagon is
10 1/2 inches (measured across the middle).

The size of the afghan is smaller than the pattern, but I was running out of most of my yarns, so I stopped making the squares when I had enough motifs to lay out a lap blanket sized afghan. I steam blocked the hexagons to the same size on my ironing board. I placed pins at each of the corners, then fit the individual squares to the pinned shape and steamed away. The iron never touches the yarn. That would melt the yarn. I placed the iron about 1-2 inches from the yarn and pushed the steam button like nobody's business. I let the hexagons cool, removed them from the ironing board and moved on to the next hexagon.

Once the hexagons were pieced together we had to decide what type of edging to use. I had to have help on this because I hung up on having a rainbow edging and working in every color that I had used in the motifs. I knew the multi-colored edging would look awful, but I couldn't let it go. Eventually Alison & my crochet buddy talked me out of it. We ended up with the navy edging on the outside that really makes the afghan come to life. 

100% acrylic, worsted weight yarns:
Loops & Threads Impeccable and Vanna's Choice solids, along
with a few lost label yarns.
The pattern can be found in our Etsy store.

Thursday, September 19, 2013

Free Monthly Pattern Download for September (crochet)

Alison was going through her vast, enormous, gargantuan vintage pattern collection and found these two Edwardian era aprons. If you are looking for a challenging crochet project, these may be it.


Pattern Info/Materials:
The apron pictured on top takes 4 balls of size 30 Cordichet, and a size 11 steel crochet hook
The apron on the bottom takes 2 balls of size 15 Cordichet, and a size 12 steel crochet hook.

Vintage Yarn Info:
Cordichet, size 30: 100% cotton, 6-ply, mercerized crochet thread. Small balls were put up in 80 yds, Large balls were 400 yds.

Click on the pattern link or check out the "Free Monthly Pattern Downloads" page to be taken to the free pattern compliments of eStitched.

Tuesday, August 20, 2013

Needle Sizings

If you have looked at any vintage pattern, especially those from the turn of the century (last one, not this one), you know what a pain it can be to determine what needle size the pattern is asking for.

We have had conversations with people asking about needle sizes required by some of our patterns and often comes down to determining when the pattern was written and the researching the type of yarn called for in the pattern. Generally, the yarn is pretty small and the needle sizes are a blindingly small size as well.

Alison ran across these cool charts from the early 1900's that show needle sizes called for in some of our really old patterns. We have put them in pdf file so you can download these little nuggets of vintage-ness.


From a Patons & Baldwin's pattern book, early 1900s.

Taken from a Fleisher's pattern book. circa 1917. 

Monday, August 5, 2013

Bestway Hats - New hat finished (knit)

So it's been awhile since we posted anything to the blog.... School ended, summer started and things went crazy from there.

I recently had a small chunk of time to make a hat. I was going a little crazy not knitting. I'm pretty sure my family would have encouraged me to knit more often if they knew how much I like doing it and how much it helps focus & relax me.

From the Bestway hat Three Hats pattern is The Cossack Hat. It is knit in bulky weight yarn, so it goes pretty fast. The vintage English needle sizes work out to a modern 10.5US (6.5mm). This was a quick project, small enough that I could throw it in my purse and work on it when I had to take the boys to some sports practice or another.

The pattern called for a vintage yarn: Sirdar Supreme, a bulky weight wool yarn. After hours and hours of searching, we couldn't find any info on this yarn online. I had a bright orange (safety orange) acrylic yarn that was re-purposed from an unfinished project that I had been given. While I think that the hat would work better in a wool or wool blend yarn, I didn't have to go out and buy any more yarn. That was exactly what I needed - no new yarn.


The first two pics show the color closest to what it actually is - though it probably doesn't matter since we aren't selling the old, re-purposed yarn.

As soon as I visit Alison and take some pics, we will post pics of the hat on a real, live person. My sad little styrofoam hat head doesn't do this cute little hat justice. Stay tuned!

Happy knitting!

Friday, May 31, 2013

1930's Vintage Sizing Chart for Knitting and Crochet

Alison found a sizing chart from the late 1930's. We don't usually see these, so we had to post this one. Garment sizing has changed dramatically in the past 80 years, so having a point of reference for vintage pattern sizes makes life a little easier when working with vintage patterns. 

The drawings for the Simple Crochet Stitches were also pretty cool. These show up in patterns quite often, but normally they've seen some wear and tear. The drawings on this page were great. It is so amazing that the drawings from way back when were as clear and detailed as today's photographs. The drawings often looked like artwork they were so precise and spot on.

Follow this link to download the chart in .pdf format.

1939 booklet.

Friday, May 24, 2013

The Bonham Fascinator

We have a completed project to show off. . . the Bonham Fascinator from the 1940s Fascinators Mantilla Head Coverings Scarf - 4 Knit and Crochet patterns.


This is a knit lace project. When Alison sent me the pattern, I immediately fell in love with it and had to make it.  I saw the black sparkly yarn and knew immediately that I was going to use it for the fascinator. I wasn't really thinking about how well the yarn would photograph. Turns out, black is really difficult to take a great picture of. That's why we have included a picture of the lace made in a dusty rose yarn.

Finished size: 55 x 22 inches (not including fringe).
I made slightly smaller than pattern called for.

Materials used:Vanna's Glamour Yarn
     - Yarn weight: Category 2 - Fine
     - Content: 96% polyester, 4% metallic
Circular knitting needles, size 10 1/2

The bobble sample:
Sample was knit with two different needle sizes. 


The top section was knit on size 8 needles. The lace is tighter and the bobbles are smaller. 
The bottom section was knit on size 10 1/2 needles. The bobbles are bigger and the lace is more open. The sample was not blocked.

Close-up of the bobbles.

 Blocking the fascinator:
On the blocking mats. It is neat to see the yarn relax and the lace pattern come to life.
I steam blocked the poly/metallic yarn. I started by inserting the blocking wires into the edges of the fascinator. Once I had the blocking wires placed how I wanted them, I pinned the wires to the mat (pins went in front of the wires to keep them from moving back and forth on the mat). Once everything was pinned down, I covered the edging with towels to keep them from flattening out with the steam. I made an edging sample to see if I liked the blocked or unblocked look. The blocked edging looked flat and lifeless to me.

Steam blocking the fascinator.
The iron does not touch the yarn. It is held above the yarn.
I held the iron several inches above the fascinator for several seconds and steamed it like crazy. This was the second time I had steam blocked a synthetic fiber, and I really like this method. It makes the shawl lay flat, and really makes the lace pattern open up. All in a relatively quick manner. I don't really have the space to wet block items, and even if I did our cats would have a heyday picking at the project.

Once I finished steaming the fascinator, I let it lay on the mat until it was completely dry. 

I purchased anti-fatigue mats from a tool company for blocking my projects. I join them together to make a blocking area that fits my project.

The pattern can be found in our Etsy store.

Monday, May 13, 2013

Free Monthly Pattern Download for May

We are back and we have a new pattern to share. . . .

Spring has sprung and summer is just around the corner. Channel the 1940s in this one-of-a-kind ribbed bandeaux summer top/bathing suit top. This knit pattern will draw all eyes to you.

Click on the pattern link or check out the "Free Monthly Pattern Downloads" page to be taken to the free pattern compliments of eStitched.


Pattern Info:
3-ply Fingering yarn:
*  4 balls of color A for one ribbed bandeau
*  4 balls of color B for other ribbed bandeau or
*  2 balls of colors A and C for the striped bandeau
 1 pair 14-inch No. 2 Straight Knitting Needles
Steel Crochet Hook No. 2
1 yard Round Milliners' Elastic for each bandeau

Gauge: 
Ribbing -- 10 rows make 1 inch; 
Stripes -- 8 sts make 1 inch.

Friday, April 5, 2013

New Project in the Works - Pinwheel Afghan


There was a bunch of yarn left over when the two ponchos were finished, and I have to use it up so I can buy new yarn. Alison sent me the Pinwheel Afghan pattern,  and I knew as soon as I saw it that it was the project for all of the different colors of yarn we had left.

This is such a cool pattern. The pattern is easy to memorize and because it's a pieced afghan, it is a portable project. I am taking the finished blocks to my sons' baseball practices and games and weaving in the ends - while practices are taking place, or when the games get a little slow.

I am using worsted weight yarns and a size H crochet hook, both of which are significantly bigger than what the pattern calls for - but that means I need to make fewer blocks to complete the afghan. Yay!

{The finished blocks are about 9 1/2 inches. I will need about 42 blocks to make the afghan the same size as noted in the pattern. About 1/3 of the blocks are complete.}

Thursday, April 4, 2013

Bag Socks (Knit Project)

From the Footlets Shoe Socks and Carry and Fold Socks or Slippers - Knit pattern:
Carry a pair in your purse to change with your snow boots or wear for bed socks or traveling slippers. This useful accessory takes only 1 (2 oz) skein of Canadiana, the Shrink Resistant and Mothproofed pure wool, two No. 8 Beehive Knitting Needles, and 1-No.G Plastic Crochet Hook (American Gauge).


These Bag Socks were a quick and easy project. The yarn is worsted weight, and the needles are big. Each sock took about 45 minutes to knit - and I'm not a super fast knitter. The crocheted edging works up quick as well.

The pattern calls for the sock and edging to be knit from the same yarn. I wanted the edging to show up on the sock so I used a contrasting color.

I used an acrylic yarn, because I have a lot of it. These little guys would be great to throw in your bag when visiting others. Quite a few people we know have a "shoes off at the door" policy. I always have cold feet, so these little bag slipper socks would provide a bit of warmth. The slippers would be nice in bed to keep feet toasty warm. But made in wool, they would be fantastic - so warm and cozy. If they were made from superwash wool, they could be thrown in the washer and dryer for easy cleaning without the worry of felting or shrinking.


We have been really busy with sports and school and I haven't had time to corral my son to have him take pics. So, I had to take these pics myself.  I have to say, the little guy is so much better at taking these shots than I am.

Friday, March 22, 2013

Same Poncho - Different Result

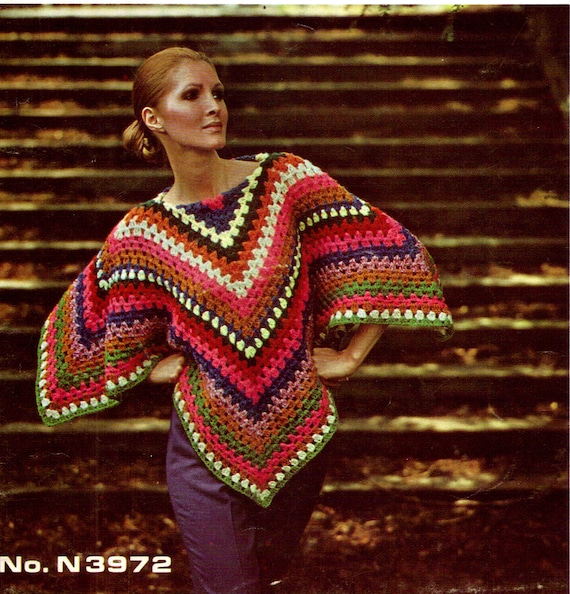
We made the 1970's Granny Square Poncho pattern again. But this time, we made the pattern by crocheting two rows of a color instead of changing colors every row. The difference is amazing. The poncho looks like it was made using a different pattern - but it's the same one as before.


We picked out some new colors. We purchased 11 colors of 100% acrylic yarn, because I didn't have a bunch of colors that would go together. I'm not sure how that's possible, I have yarn everywhere!


To compare the two different methods of patterning the yarn, take a look at the poncho pics side-by-side.


There was quite a bit of yarn left over, so I am embarking on another project with the remaining yarn.

- - - - -

Special thanks to Jake, my 8-year old son, my photographer.

Monday, March 11, 2013

1929 Needlewoman Magazine - Small Articles and Great Pictures

Alison found this great needlework magazine from 1929, The Needlewoman. It has a fantastic cover with great colors. I love it. Plus, inside, there are some terrific short articles.

The colors are great and the table setting - I just wish my table was set this pretty. No chance with 2 boys. It would be the end of their world if I set the table to look this girly.

"Added" Hair and Pantalettes Again.

The picture of the gown on the right is a stunning example of formal wear of the time. From the bottom right: Make sure you find the right hair dresser. It's okay to be seen at the new-fangled hair salon. Other women are getting their hair styled, too.

Who wouldn't want to be seen in any of these gown?

You can click on this link to download a pdf of these pages.

We do not have the full magazine, but it is fun and interesting to see what type of ads were around in the 1920s and 1930s. It's fun to see how styles have changed - bigger hair, more skin visible. And, imagine going to the hair salon in secret, so no one would know that you were getting your hair cut, colored and styled. Imagine not hearing the noise and chatter going on around you as your were at the salon. It's impossible, isn't it?

Friday, March 8, 2013

Free Monthly Pattern Download for March

We have a truly vintage item for this month's free pattern download.... A Fern Strip Chair Set with Fringe. It is a knitting pattern from 1944.

Click on the pattern link or check out the "Free Pattern Downloads" page to be taken to the free pattern compliments of eStitched.


Pattern Info
Measurements:
Chair Back 13 1/2" x 15"
Arm Pieces: 7" x 10" including fringe
Materials Required:
J&P Coats or Clark's ONT Pearl Cotton, Size 5 (8 balls)
Knitting pins, size 1

Wednesday, February 13, 2013

Free Monthly Pattern Download for February

This month's free pattern is a halter top. Start one now to have it completed in time for summer wearing. Click on the pattern link or check out the "Free Monthly Pattern Downloads" page to be taken to the free pattern compliments of eStitched.


Saturday, February 9, 2013

70's Granny Poncho - It's a Wrap!

I am so excited for this post.

The 1970's Granny Square Poncho is finished. I had finished it a short time ago, but I needed to wait until we had a free Saturday so my 8 year old son could take pics of the finished product. He is turning into quite the little photographer.

This version is different than the photo on the pattern. On the pattern, the color changes take place every two rows. On my version, I had a color change every row. I am now really good at weaving in ends. I also learned how to crochet over the ends at the beginning of each row to almost "lock" the yarn in place. Weaving in ends is a great skill to have. I'm not afraid of having to do it any more. I weaved in (wove in?) the ends as I went so it wasn't completely overwhelming when I finished the poncho.


I consider myself an advanced beginner crocheter, and this was an easy pattern. Start to finish it only took a few weeks - working on it intermittently during that time (while watching TV or sitting with the kids as they did homework). I used 100% acrylic yarn from a big craft store.

I am working on another Granny Square poncho - this time with color changes happening every other row. The ponchos look completely different. We will be posting a side-by-side comparison once the 2nd one is completed.

Happy Crocheting!

Interested in making this yourself? Head over to our Etsy store for the pattern.

Tuesday, January 22, 2013

Calculating the Circumference or Diameter of a Circle

Good morning. This post was inspired by a conversation we had with a customer in our Etsy store.

As you may know, many of the old old old patterns do not include gauge or tension swatches or finished sizes in the patterns. It's a bit challenging to make a project without knowing what the final size of your project will be.

I found this radius, diameter and circumference calculator while working on a project last year. But I have found that it works great and comes in handy when working hats from the top down (with or without a pattern). You just need to click on the site, and enter the circumference measurement of your head, then click the "get the other values" button to see what diameter measurement you need to make the hat fit your head.

Because I don't always follow a pattern the way it was written, I find that I end up using the calculator to make a hat that fits my big noggin.

Click here to Calculate the circumference, diameter or radius of a circle.

This site is really useful for sewing and art projects and helping kids with their homework, too.

Friday, January 11, 2013

Free Monthly Pattern Downloads

We have started a new page: Free Monthly Pattern Downloads, where we will be posting free patterns to download - knitting, crochet & occasionally sewing patterns. 

The pattern for January is a Ribbed Skirt pattern. Click on this link to "Monthly Pattern Downloads" under "Pages" to access the pattern download.

Happy Knitting from eStitches!

Friday, January 4, 2013

Spinning Wheel Afghan - Update


 In making up the first set of diamonds to measure sizes, the finished dimensions turned out to be 7 1/2 inches square. Michele calculated the final size of the afghan to be very close to the final size shown on the pattern.
Michele crocheted a row of single crochets around every single block. She crocheted a specific number of stitches on each side of the diamond. The row of single crochets gave her a way to line up each side of the diamond with the corresponding side of the next diamond.
 - - - - -
Finished size of afghan from pattern: 68 x 46 inches.
Finished size of afghan using Simply Soft yarn: approximately 67 1/2 x 48 inches.
Each row is made up of either 8 or 9 blocks. (Michele created a layout guide to make life easier for herself.)
Paper template for diamond blocking.
Michele spent quite a bit of time laying out the blocks, and sewing blocks and rows together, and found that the diamonds needed to be blocked prior to being sewn together. The diamonds are bubbly and bunched before blocking. After blocking they lay flat and are easily sewn together. (pic of blocked & unblocked diamonds)
Each of the diamonds was finished, then steam blocked to an exact size. We didn’t have any template material that would not melt under the hot steam, so Michele used a piece of paper with the exact measurements of the diamond marked on it. (pic) Be careful with the steam blocking—the iron should not touch the block—doing so can melt the acrylic yarn.

Unblocked vs blocked diamonds.
Once the diamonds were blocked, Michele sewed the diamonds into three-diamond blocks. The blocks were then sewn into strips and the strips were then sewn together.
Michele put her heart and soul into this project. The math on this project would have completely overwhelmed me. 

2 strips of blocks sewn together. We are well on our way to finishing the afghan.

Wednesday, January 2, 2013

New Project Started - It's a Poncho

Happy New Year!

1970s Granny Poncho - Crochet pattern PDF 7072
Granny Square Poncho
We have a new project started. The Granny Square Poncho is in the works. I started it while visiting family over the Christmas break.

We are using 100% acrylic weight yarn - as the pattern called for.  The yarn seems to be a little heavier than the original, so to make it have a little more body, and not be too floppy, we are using a crochet hook one size smaller than called for on the skeins.

The process has been a little weird as I am teaching myself how to hold a crochet hook differently than how I originally learned.
I learned to crochet by holding the hook like a pencil. Working on this poncho was making my wrist click and pop like nobody's business. I decided that I couldn't live with the noise and started holding my hook in the palm of my hand - more of a gripping of the hook than a holding of it.

The color palette-Granny Square Poncho
Slowly I am getting faster with my new grip on the hook. My wrist doesn't click and pop like it did before, and I'm not as sore when I finish up several rows of crochet. It is getting easier.

Like the pattern? You can find it in our etsy store: Granny Square Poncho listing.